Set up a staging site for my Managed WordPress site
A staging site lets you build and test your website without modifying the content visitors see on the live production site.
Set up a staging site for my Managed WordPress site
A staging site lets you build and test your website without modifying the content visitors see on the live production site. Here are some things you should keep in mind when using a staging site:
- All Managed WordPress plans (except Basic) have a staging site for each live website. If you have a Basic plan, you must upgrade your account to have a staging site.
- Staging sites use a domain we automatically generate for you. You cannot choose a different domain or add another domain to the staging site.
- Your staging site is persistent. We don't destroy and create staging sites for you whenever you push or pull content from them. This can explain some synchronizing issues you might experience.
How do I use a staging site?
Your staging site starts as a fresh install of WordPress hosted alongside your production site. You can pull the contents of your production site into the staging site. When your work is complete, you can push the changes you made on the staging site into production to make them live.
This is the normal order of operations to get started with a staging site:
1. Create my staging site
Step 1: of the Get started with staging series.
Create a Managed WordPress staging site to test changes without affecting your live site.
Note: Staging sites are available on all Managed WordPress plans except Basic. If you have a Basic plan, you'll need to upgrade your plan
- Go to your Wurk product page.
- In your My Products page, next to Managed WordPress, select Manage All.
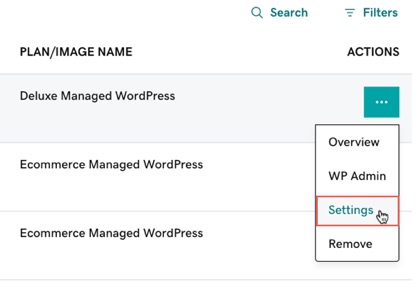
- For the website you want to create a staging site for, select Settings from the menu.
- Under Staging Site, select Create.
It'll take a few minutes for us to create the staging site.
2. Pull my production into staging
Step 2 of the Get started with staging series.
Note: If you previously set up your staging site and need to pull your current production site in, follow these steps. If you're just starting your staging site, you can continue the process in the next article, Access my staging site.
When you pull your production site into staging, it copies your live site with all your plugins, themes, and other content to your staging site. You can edit the staging site as much as you want without those changes affecting your production site.
Note: Any custom code or assets not stored in the /wp-content folder will not be moved to and from staging.
- Go to your Wurk product page.
- On your My Products page, next to Managed WordPress, select Manage All.
- For the website you want to pull into staging, select Settings from the menu.

- In the Staging Site section, select Actions and then select Sync Sites.
- Select Pull production to staging.
Note: Choose to Overwrite content if you're syncing your sites for the first time or if you're certain you want to overwrite the staging site database. If you do not choose to Overwrite content, only files will be pulled into staging.
- Select Sync.
Syncing your staging site from your production site may take a few minutes based on the size and complexity of your site.
Next, you'll learn how to access your staging site.
3. Access my staging site
Step 3 of the Get started with staging series.
You can access your Managed WordPress staging site to edit your site content without affecting the live website.
The staging site will contain the content from when you last saved changes to the staging site, or from the last time you pulled content from the live website to the staging site.
- Go to your Wurk product page.
- On your My Products page, next to Managed WordPress, select Manage All.
- For the website you want to access the staging site for, select Settings from the
 menu.
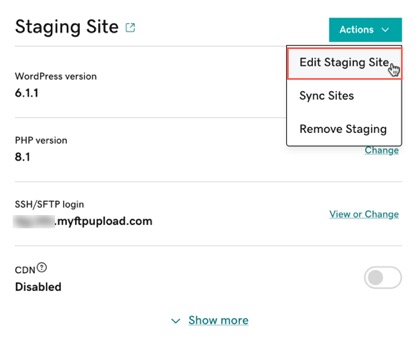
menu. - In the Staging Site section, select Actions.
- From the menu, select Edit Staging Site.

Now that you're familiar with accessing your staging site, you can begin making any necessary changes to your site. Next, you'll learn how to view your staging site.
4. View my staging site
Step 4 of the Get started with staging series.
You can view your staging site to preview your changes before pushing them into your live production site.
- Go to your Wurk product page
- In your My Products page, next to Managed WordPress, select Manage All.
- For the website you want to view the staging site for, select Settings from the
 menu.
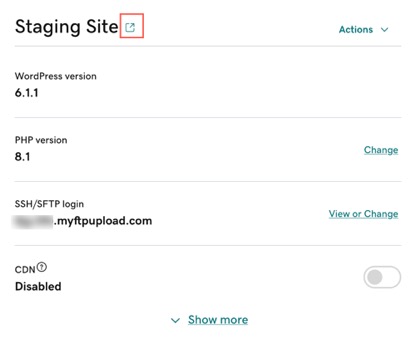
menu. - In the Staging Site section, select the View Site icon.

Now that you know how to view your staging site, you can test your changes or updates. In the next step you'll push changes from your staging site to your production site.
5. Push my staging site into production
Step 5 of the Get started with staging series.
Warning: By default, the sync process will only overwrite site files and not the database. If you check the box to Overwrite content, the database will also be overwritten.
- For all sites:
- Make sure the content in your staging site is what you want on your live site before you push the changes to production.
- Any custom code or assets that are not stored in the /wp-content folder will not be moved between staging and production sites.
- For Wurk ECommerce sites:
- You also need to understand the Wurk ECommerce update process before pushing content to your live site.
- Any new orders or customer data on the production site will be overwritten by the older version from the staging site.
After making changes in your staging site, you can push those changes to your live production site.
- Go to your Wurk product page
- In your My Products page, next to Managed WordPress, select Manage All.
- For the website you want to push the staging site changes to production, select Settings from the
 menu.
menu. - Under Staging Site, select the Actions menu and then select Sync Sites.
- Select Push staging to production. Only select Overwrite content if you want to overwrite the database as well as the files in your live production site.
- Select Sync.
Syncing your production site from your staging site may take a few minutes based on the size and complexity of your site.
Once you finish testing or troubleshooting, you can remove your staging site.
Need help? Find help in our knowledgebase or simply chat to us .
Wurk and its subsidiaries are registered services provider.