Move my WordPress site automatically to Managed WordPress
Managed WordPress comes with an auto-migration feature to conveniently move your existing site
Migrate WordPress
Learn about moving WordPress in a variety of different ways
Move my WordPress site automatically to Managed WordPress
Note: View Wurk Managed WordPress hosting plans
Managed WordPress comes with an auto-migration feature to conveniently move your existing site.
Note: If you're moving a WordPress site from WordPress.com, you'll need to use alternative steps (Move my site from WordPress.com)
- Go to your Wurk product page
- In your My Products page, in the Managed WordPress section, select Manage All.
- Select Create WP Site button in the top right corner.
Note: If you have more than one Managed WordPress plan available in your account, you'll be asked to select the plan you want to move your site into.
- Select I want to move an existing WordPress site.
- Follow the wizard and fill in the appropriate fields. You'll need the following details to start the process:
- Domain name of the site you're migrating.
- The WordPress username and password for the site you're migrating.
- At the end of the wizard, select Next to start the migration.
Larger and more complex sites could take more time to complete. We'll send an email when your site finishes migrating.
Related steps
- Sign in to your Managed WordPress site
More info
- Migrate my WordPress site manually
- Preview your website using hosts files
- Preview your website using files
- Change the domain on my managed WordPress website
Migrate a WordPress site with a plugin
Required: You can save time and avoid possible troubleshooting difficulties by doing the following before you start migrating/cloning your WordPress site:
- Update your plugins and theme to the most current version.
- Update your WordPress version to the most current one.
- If possible, the PHP version of the destination site’s hosting should match what your source site is running on (PHP 7.4 -8.1 are available) on our Linux Hosting and WordPress Hosting plans).
- Consider checking your source website for malware infection This option is available once you add the source site to your ManageWP dashboard.
ManageWP offers a hassle-free and secure solution to migrate your WordPress site. This plugin-based method allows you to transfer your site without needing FTP or database access, making it a convenient option for moving your WordPress site. Here’s how to get started.
- Install the ManageWP Worker plugin in your source and destination WordPress site.
Note: Managed WordPress plans already have the Worker plugin installed and activated. In this case, you do not need to install the ManageWP Worker plugin, and you can find the Connection Management under Managed WordPress.
- Sign in to your ManageWP dashboard If you don’t already have an account, sign up for an account
- Add your source and destination WordPress sites to the ManageWP dashboard.
- In your WordPress dashboard, locate the ManageWP Worker plugin in your plugins list. Select the Connection Management link and copy the connection key.
- In your ManageWP dashboard, select
 Add Website in the upper left corner of the page. Enter the URL of the website you’re adding, then select connection key instead, add the connection key, and then select Add website.
 - Do this for both the source and destination WordPress sites.
- Once your source and destination sites have been added to the ManageWP dashboard, select the source site.
- (Optional) If you're moving a commerce site, we recommend putting your site into maintenance mode before moving it. This will prevent any lost orders that may be processed during a migration.
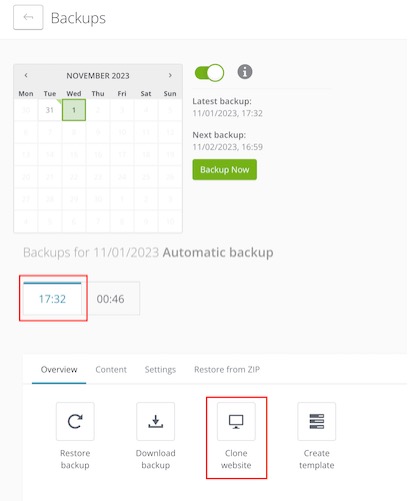
- Select Backups, then Activate Backups, and then Activate. Wait for the first backup to be created.
- Select an existing backup and then select Clone website under the Overviewtab.

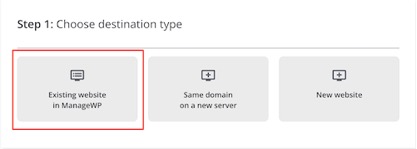
- Under Choose destination type, select Existing website in ManageWP.

- Select the destination website from the list.
- (Optional) You can create a new admin user during the cloning process.
- (Optional) You can adjust the Search engine visibility for the destination site. The options are Do not change (default), Enable, or Disable.
- Select Clone.
This process may take some time, based on the size of the website you’re cloning. Once the operation finishes, you should sign into your destination site and make any necessary adjustments.
Note: If you are having trouble with the ManageWP Worker plugin, you can reach out to. the developers directly.
More info
- Install the ManageWP Worker plugin
- Find the Worker plugin connection key
- The ManageWP user guide to clone/migrate a WordPress site
- The ManageWP guide for WordPress security
Need help? Find help in our knowledgebase or simply chat to us .
Wurk and its subsidiaries are registered services provider.